Installing and running civet on the command line
IS THIS YOUR FIRST TIME RUNNING CIVET? IF NO, SKIP TO THE NEXT SECTION.
INSTALLATION
If this is your first time running civet, you’ll need to clone the repository and install it.
I like to keep my repositories in the same place so they’re easy to find, so below I’m making a directory in my home directory (~) called repositories and moving into it with cd.
Now we’re ready to clone the civet github repository. This creates a local copy of the civet repository on your computer.
This directory remains linked to the original github copy, so if you need to update it or get any changes you can do that from this location with the following command:
We now need to create the civet environment. Hopefully we have mamba installed, check if you do with the following command:
If you see the message “mamba not found” then you should install mamba with:
If you saw the version of mamba printed, you can now create your civet environment.
Activate the civet conda environment:
The ‘(civet)’ tells you that the civet environment is activated.
Now you’ll need run install the civet python package while you’re in the environment:
Don’t forget the ‘.’ in the above command, it indicates you want to install the package in the current directory.
Now you will have civet installed, check this worked with:
If no errors have come up yet, you should now be ready to run civet!
Double check you’re in the civet conda environment:
Good practice is to check for and install any updates:
Once we know we have civet installed, you want to first prepare a background dataset. This dataset should consist of an aligned fasta file, a metadata file that contains a row of information for each sequence record in the fasta file, and optionally a SNP file.
GETTING A GOOD BACKGROUND DATASET
In an ideal world we would use all sequences (>12 million) on GISAID, but this is untenable on local laptop computers. In this case we’ll want to tailor-make a background dataset, to cross-reference using civet.
Minimally, you should have:
1. FASTA (an aligned fasta file)
>seq1
ACAGTCGCT….CGATCATACGA
>seq2
ACA--CGCT….CGACCGTACGA
>se3
ACAGTCGCT….CGATCGTACGA
2. METADATA (minimally a column that matches the sequence name, and any other information you might have about the sequences)
name,sample_date,lineage, …
seq2,2022-06-02,BA.5, …
seq2,2022-06-01,BA.4, …
seq3,2022-06-04,BA.4.1, …
Example background dataset
A good place to start getting a background dataset is on gisaid.org. The following is a step-by-step guide to downloading the latest next-strain background sample set (~3K sequences).
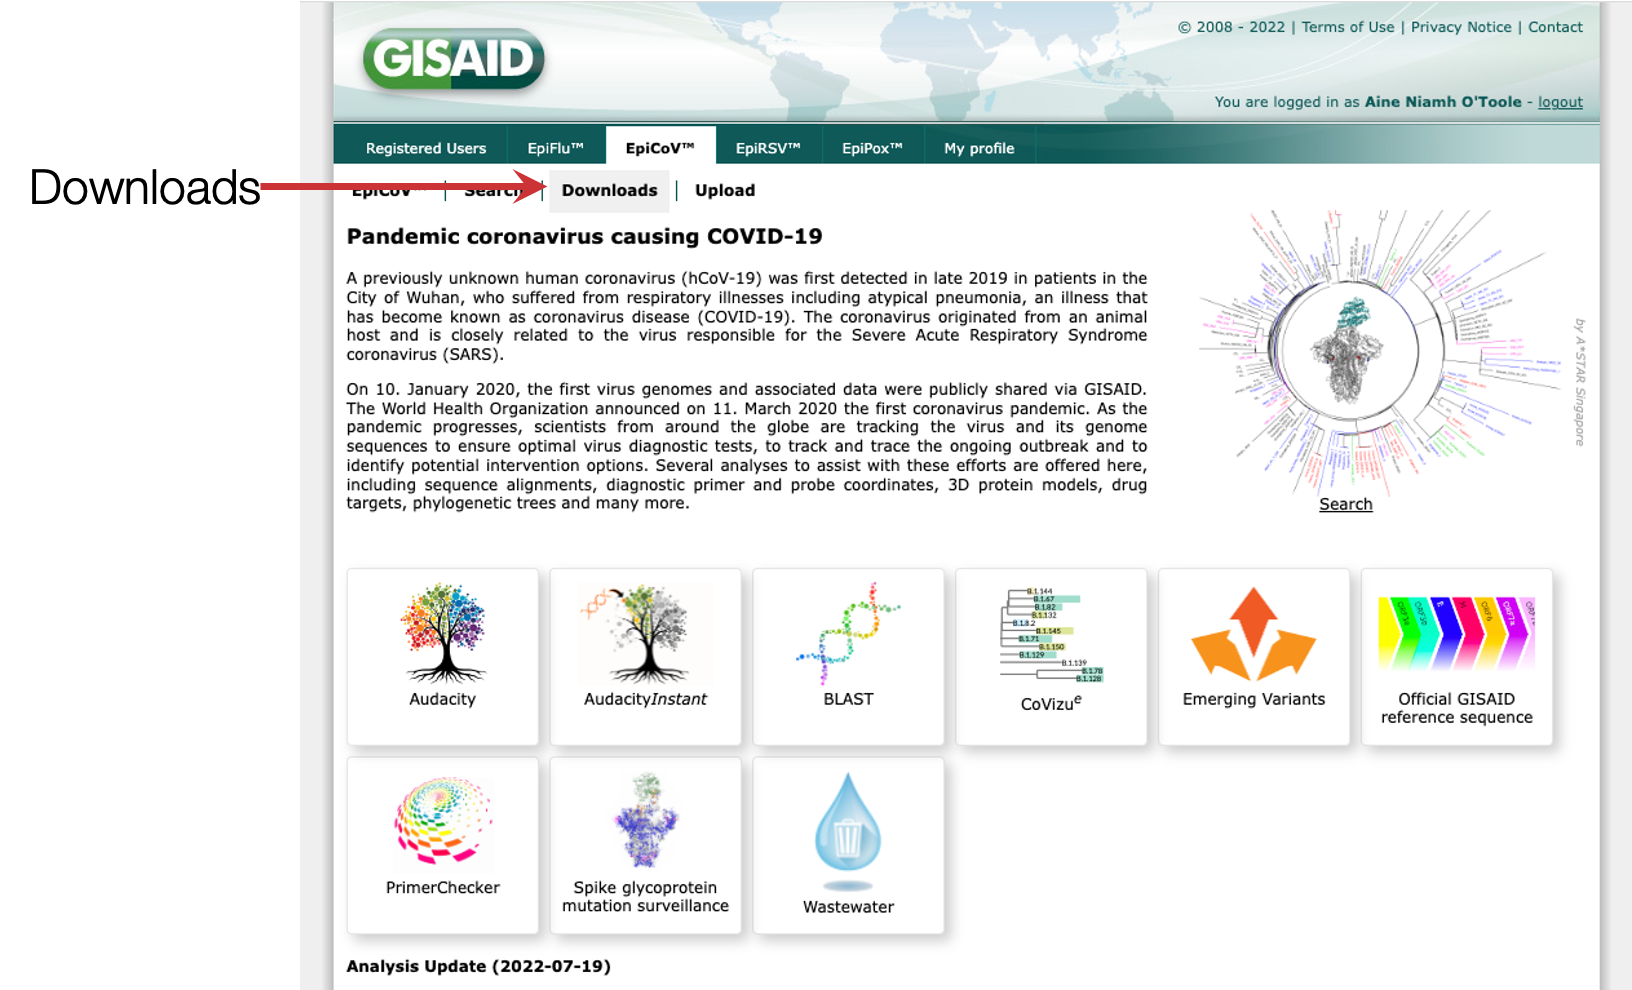
Step 1: Log into gisaid (or register for an account if you don’t already have one) and navigate to the downloads window on EpiCoV.
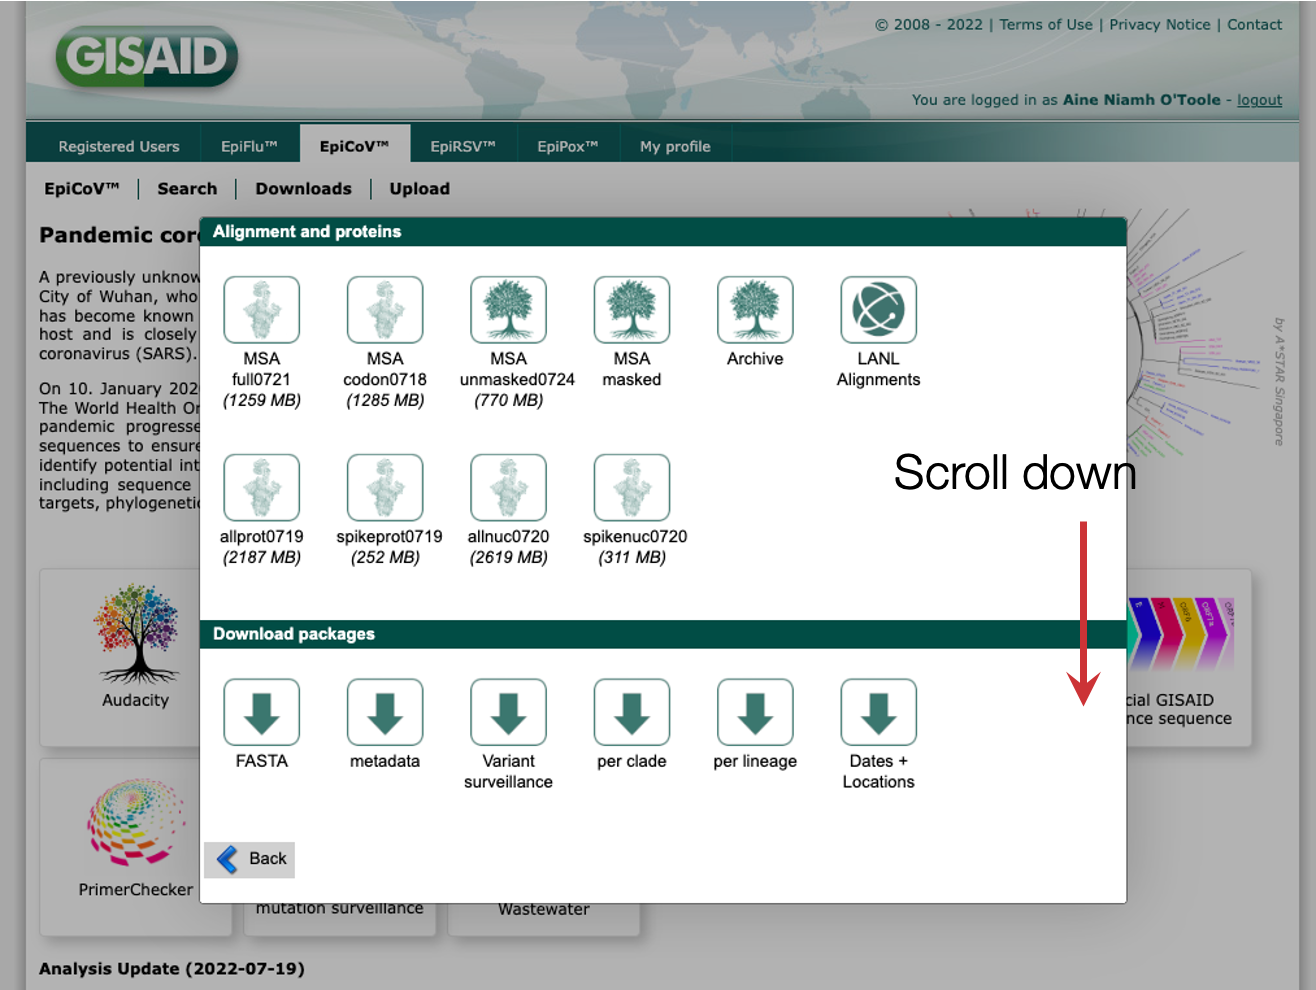
Step 2: Scroll down to the bottom
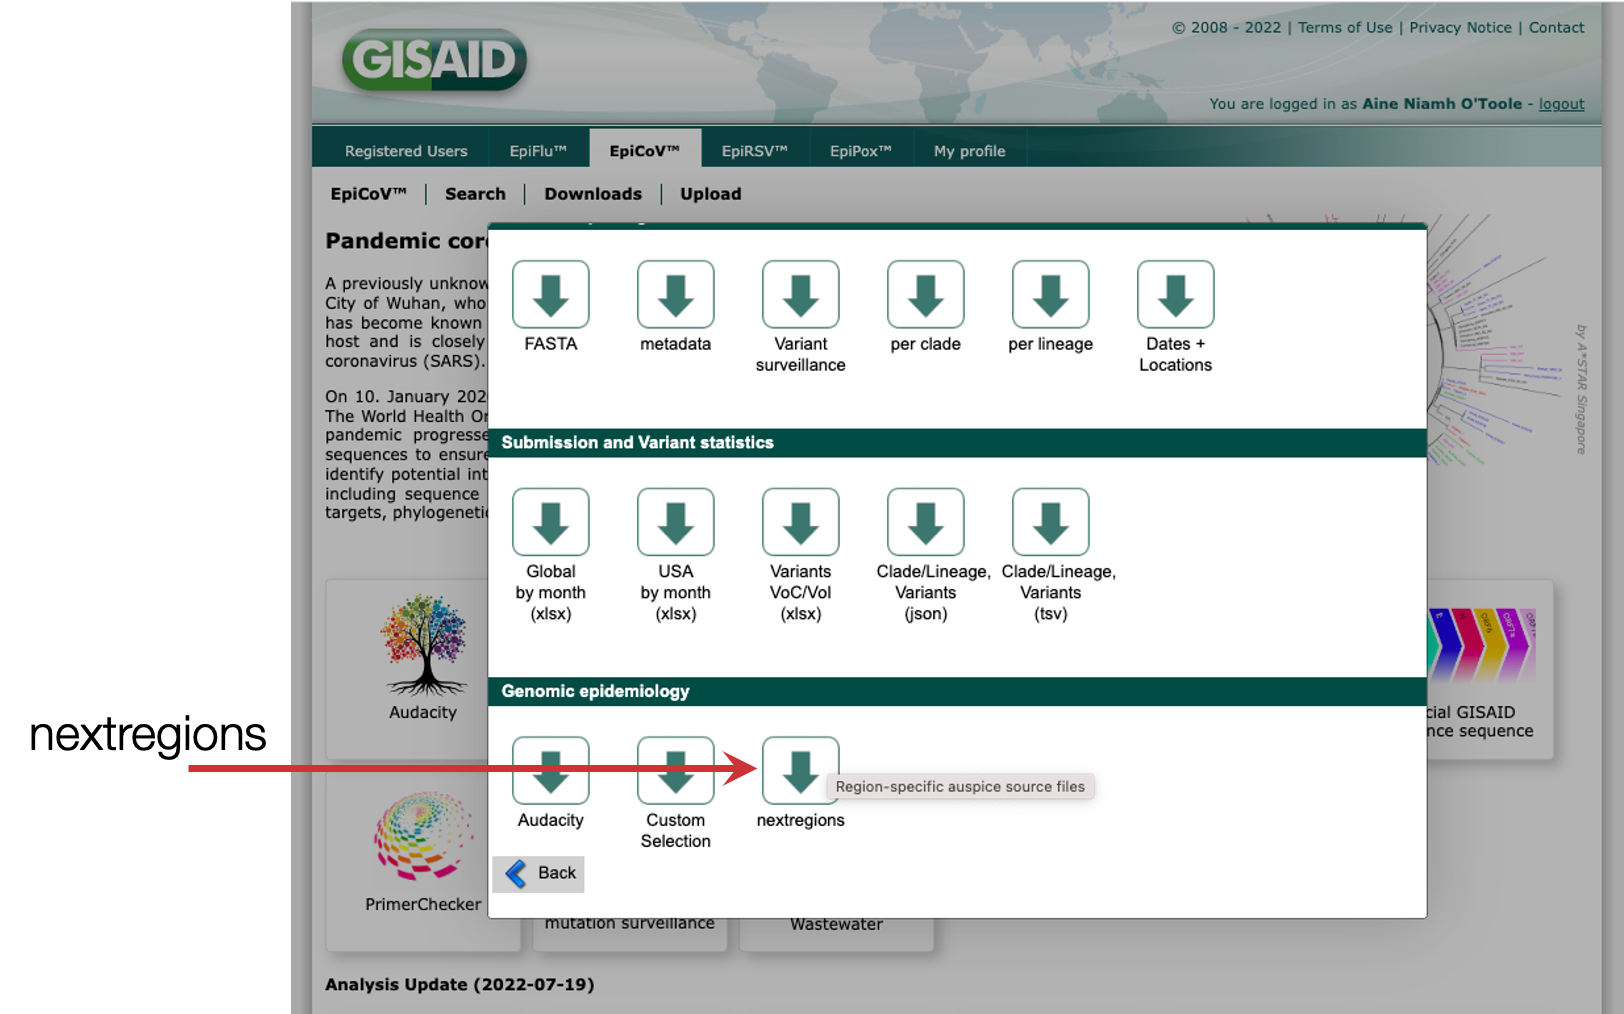
Step 3: Click on the nextregions download option
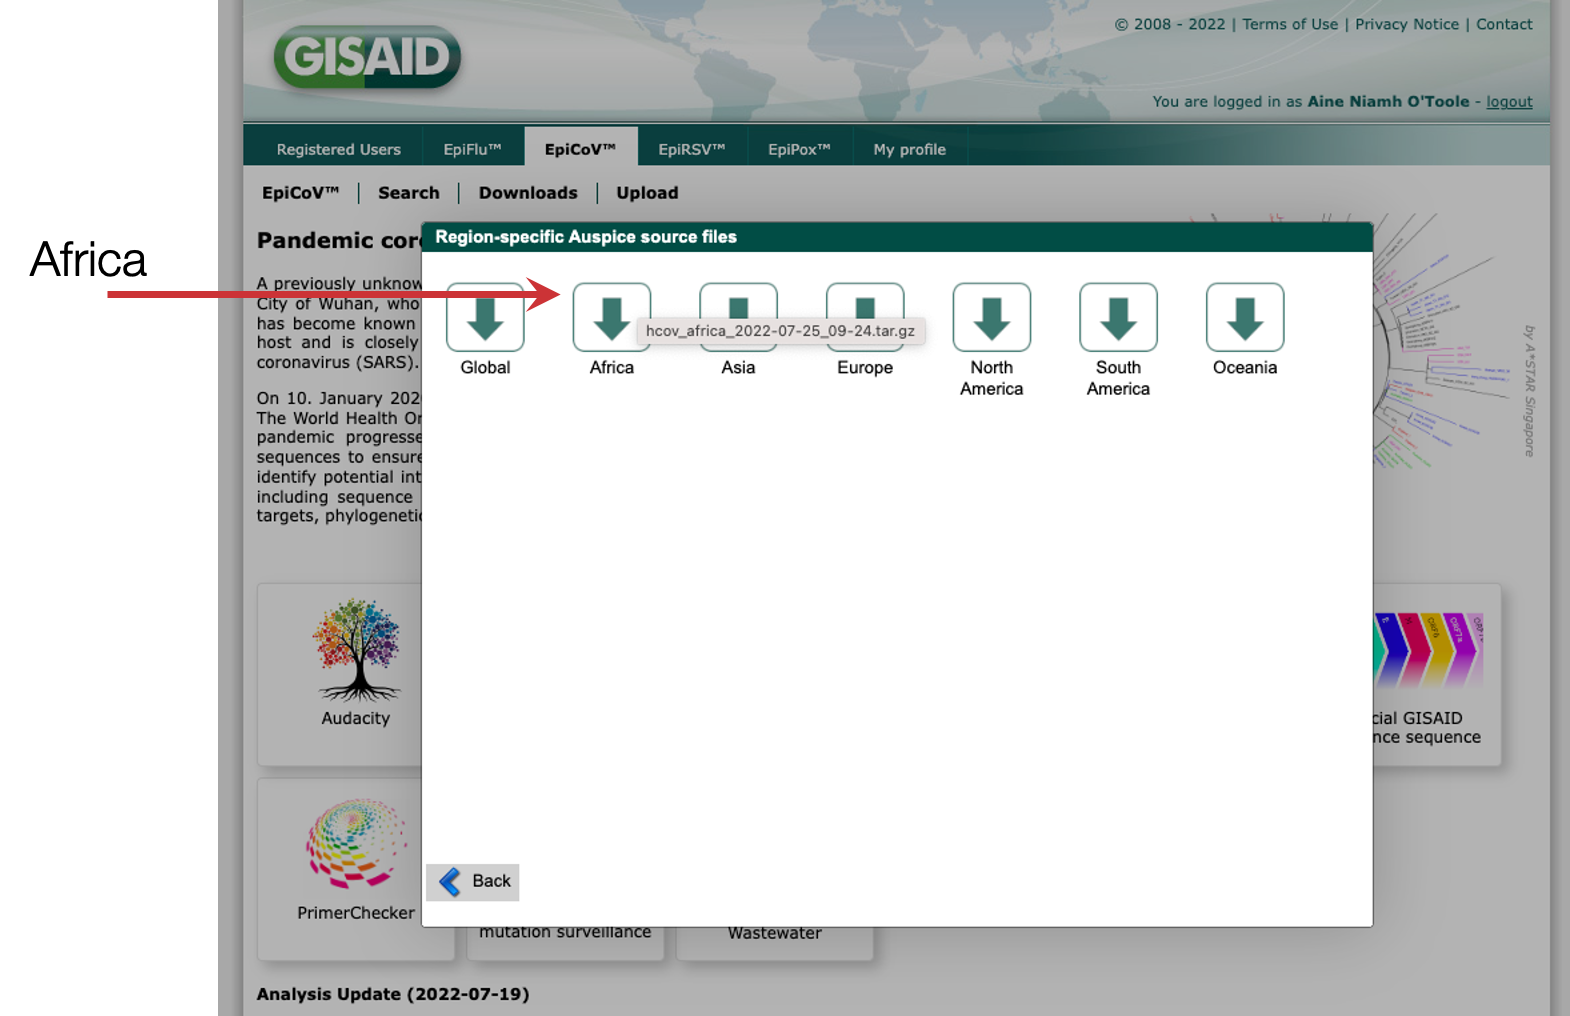
Step 4: Download one of the latest downsamples, for example the Africa build which is enriched for sequences from the African continent. Which one you download will depend on what you want to investigate, where you are based and what locations are most connected to your location of interest.
Step 5: Unzip the downloaded file and look in the directory. You will see 4 files. One is the GISAID user agreement (readme.txt), one is a json file with the format of data for running nextstrain auspice, but the two we’re interested in using with civet are the fasta file (the sequences) and the tsv file (the metadata).
Step 6: We now need to curate this metadata to make sure our sequences can be matched with the metadata file (this mostly involves removing spaces from the sequence file name). By default the nextstrain tsv file has a column called ‘strain’ that should match the sequence file, this is not always the case so with civet we will create a new file with a modified column that will successfully match. We also need to make sure the file is aligned in a way consistent with the way civet will align new sequences. Both of these steps are run with the following command. Note, the backslashes indicate the command continues onto the next line.
This command produces a directory called civet_data, that contains the following files:
What’s changed in the metadata file:
The new column that will match your sequences to the metadata will be `modified_{orginal_name}`, i.e. because `strain` is what nextstrain call the column, by default we will now have a column called `modifed_strain` that we will use to match.
You can rename this column to something more descriptive like “sequence_name”, which is what civet looks for by default, or just make sure to supply `--background-id-column modified_strain` when running civet.
Tell civet where this data is:
When running civet, you can point the software to this directory with `-d/–datadir`, or set it as a command line variable with:
You can even add this variable to your bash_profile, or zshrc so that the path is always loaded by default. If updating this data, by saving it in the same directory and overwriting with latest data you can maintain an updated background dataset.
Bear in mind that you will only want to have one fasta file, one metadata file and one SNP file in this directory though, or else you’ll need to explicitly tell civet which ones to use.
ALTERNATIVE BACKGROUND DATASETS
This is just one way of accessing a background dataset. You can create a variety of custom background datasets by accessing gisaid or ncbi SARS-CoV-2 genome data. You might also want to create a local dataset with all the previously sequenced data from your institute, so that when you have new sequences you can compare them against all the samples you’ve previously sequenced.
FINALLY we’ve gotten to the point where we can begin to run civet
Civet can accept information in two ways: 1. From the command line arguments or 2. From a configuration file in yaml format. If you supply a combination of the two (some on the command line, some from a config file) the command line arguments will always take priority and overrule the config option.
Scenario: One of the simplest use cases, you want to summarise all the data from a given country in your background data.
Input data: The background dataset
This will produce a report that highlights all sequences from Ghana in your background dataset as sequences of interest.
Scenario: If we want to filter this further, we might just want to summarise all the data between April and July 2022 from Ghana in your background data.
Input data: The background dataset
This also highlights why it’s so important to keep consistent with date formats in metadata. We recommend using ISO format YYYY-MM-DD for all dates in your metadata. This command will produce a report that highlights all sequences from Ghana with date in the timeframe specified.
If you have any particular sequences you’d like to investigate in your background data you can specify them with the -ids flag:
Scenario: a small number of sequences of interest in your background dataset
Input data: The background dataset
This will produce a report that highlights the two sequences with GISID IDs EPI_ISL_12012922 and EPI_ISL_12970473 in your background dataset. You need to specify what ID column to match with -bicol (background_id_column) and then still make sure you’re matching the sequences with the correct column name (-sicol/–sequence-id-column).
Scenario: We have new data in a fasta file that has just been sequenced and we want to produce a summary report of this data.
Input data: The background dataset, new fasta file with genome sequences
This will add your new sequences from the fasta file into the report and produce a report that highlights these sequences within the context of the background dataset.
Scenario: We have new data in a fasta file AND some associated metadata with epidemiological information, and we want to produce a summary report of this data.
Input data: The background dataset, new fasta file with genome sequences, metadata about the new sequences in a csv file.
To match the metadata up with your new genome sequences you need to make sure there is a column in the metadata that corresponds to the name of the sequence in the fasta file. By default civet will look for a column `name`. If your column is called something other than name, you’ll need to specify what the column is when running civet. For example, if that column was `sequence_id`:
This will add your new sequences from the fasta file into the report and produce a report that highlights these sequences within the context of the background dataset.
Scenario: Using a configuration file
As you can see, the commands for civet can get a little unwieldy as more and more options get specified. If you’re going to be running similar reports, with similar-structured data, you can create a configuration file that can be used again and again to create a report. The above command can be converted into a configuration file as such:
config.yaml
Note: The configuration file keys are the long-form command line arguments with either dashes or underscores (so input-metadata and input_metdata are both accepted).
Now we can continue adding to the configuration to create a bespoke report:
config.yaml
The additions here change the title of the report, change the annotations on the tree tips, and specify that we want to run “the usual” analysis, which will produce a report containing summary tables, the catchment phylogenies, snipit plots and a timeline of samples. Because it now specifies a plot that includes a timeline, we need to tell civet which column to parse date information from (by default it will use `sample_date` but if our metadata has anything other than that we’ll need to specify what that column name is. In this case we’ve told it to look for data in the column `collection_date`.
Civet has many, many configurable options. To see the full command-line usage of civet pull up the help menu:
Also check out the full documentation for civet at cov-lineages.org/resources/civet.html
If anything isn’t clear, or civet does something funky you’re not expecting, feel free to post an issue to the Github repository for civet here.